Blueberry Scones

Summertime evokes memories of picking blueberries — my favorite berry — with my dad and sister on a mountaintop in the Adirondack Mountains. We would walk down the dirt road to the Methodist campground along the Hudson River in a country town called Riparius in upstate New York. Here, the river was shallow with a gentle, swimmable current that turned to swift rapids in the Fall when rafters, even the Kennedys, would take to the swiftly moving waters for thrills and adventure. But this was our summer home, the summers of our childhoods when Dad was a bandleader at a summer resort. Although August meant that summer would soon end and we would return to the city and go back to school, August was my birth month and the month when big, sweet, juicy blueberries would ripen on the mountaintop in the campsite.

One year, Dad took ten-year-old me and my little sister up the winding dirt path, as high as we could go, because that was where we would find the most berries for our pies, pancakes, and cereal. We would carry our plastic sand pails that we took to the beach every day, but on berry-picking days, they became blueberry pails. We would pick and fill until we had three pails full and had eaten all that we could while we picked. It always felt closer to the sun at the top of that mountain, which in reality was more of a large hill. But at the top, the sun shone down on us with scrub and brush. It was only as we made our way back down the dirt path with our treasure that the taller tress shaded and cooled us. But this was where the downhill hike became slippery and tricky. The trail veered sharply to the left, and if you weren’t careful, you could slide straight off the side of the mountain.

On this particular day, I remember I was sweating, miserable and in a hurry to get down the hill, so I walked far ahead of my dad and younger sister. My dad called out for me to slow down so I wouldn’t spill any of the berries. Just as he cautioned me, my Keds skidded in the dirt, I landed on my bottom, and I slid right to the very edge of the slope, one foot dangling over the edge. All I could hear was my dad’s voice calling, “Save the blueberries!”

Miraculously, I managed to hold the pail up high by its handle, keeping it upright without spilling a single juicy blue orb. By the time I got to my feet, my dad and sister reached me. Dad kept asking if I had spilled any of the blueberries. I asked him if he’d even worried about me for one second, and he suddenly set down his pails of berries to give me a hug and a sigh of relief, waiting until I stopped shaking. My sister started to cry as she realized what might have happened.

We had a leisurely stroll home, walking three abreast down the dirt road and towards the hilly path up to our summer cottage above the river. The gentle rush of water and the breeze through the trees helped cool and calm us and by the time we reached mom, we were able to laugh as we told the story of “Save the blueberries!” Somehow, the pie we baked that day seemed to be sweeter and juicier than any we had previously baked. Each summer, we would bake with Dad, and we added new blueberries recipes to our repertoire — pies, custard tarts, muffins, pancakes, and waffles.

As an adult, I love all berries, and buy more than I can eat every time I grocery shop. Sometimes I spread them out on cookie sheets, then freeze and bag them for use once their season ends. One of my favorite recipes for blueberries is one that I’ve worked hard to perfect over the past several years. You see, I’ve loved tea and scones ever since we travelled to England when I was fifteen. But somehow, when I’ve bought them in the states, they’ve quickly turned into tasteless rocks.

The secret I’ve learned from other bakers is actually a trick I’ve used for my homemade pie crusts for over thirty years — grate frozen unsalted butter for the recipe — I prefer Kerry Gold or Cabot, and then chill the dough before baking. This produces a fluffier scone, crisp on the outside but moist and ready for butter to melt and drip as we devour the warm berry-laden pillows of goodness.
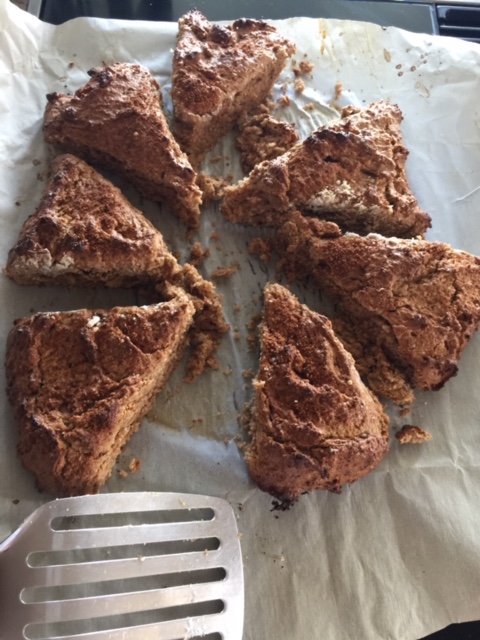
Blueberry Scones

2 cups AP flour^

1/2 cup granulated sugar (or 1/4 c. granulated + 1/4 c. turbinado)

2 3/4 teaspoon baking powder

1 1/4 teaspoon Vietnamese Cinnamon*

1/2 teaspoon salt

1/2 cup unsalted frozen Kerry Gold butter (1 8 T. stick)

1/2 cup heavy cream or half and half (but nothing lighter, and nut milks just won’t give you the same texture)

1 large egg

2 teaspoons pure Madagascar vanilla extract

2 cups blueberries++

Directions:

  1. Use a large whisk to combine the first 5 (dry) ingredients in a large bowl
  2. Grate the frozen butter directly over the flour mixture to avoid losing any in the transfer from another bowl
  3. Cut the butter into the dry ingredients (I have best results with a wire pastry cutter, but I’ve also used my hands) The trick is to work quickly so the butter doesn’t melt too much, but you want the end result to feel like a bowl of tiny peas)
  4. You can refrigerate this mixture while you mix your wet ingredients, or you can have your wet ingredients ready to combine into the dry mixture. The trick is to work quickly here to keep your butter as chilled as possible.
  5. Wet ingredients: In another bowl, use a hand mixer to combine cream, egg, and vanilla extract. Add to the dry mixture and as you are working the dough, add your blueberries. Use a rubber spatula to gently work the blueberries into the mixture, working until all the dry ingredients are incorporated into the wet, and your blueberries are nicely dispersed throughout the dough without breaking too many.
  6. At this point: Preheat oven to 400 degrees; Chill your dough in the refrigerator; Wash your berries, being sure to pull any stems that might still be attached.
  7. Once your oven is ready, remove the dough from the refrigerator and turn it out onto a well-floured counter or onto a sheet of parchment paper that will fit your cookie sheet. The dough is somewhat sticky, so don’t try to use a rolling pin. Rather, flour your hands and gently work the dough into an 8″ round, about 1 inch thick, so it will fit but not hand over the sides of your cookie sheet.
  8. Cut your dough into 8 wedges using an ulu cutter (a wedged cutting tool you can rock back and forth to separate the wedges – I LOVE mine! It was a gift someone brought back from Alaska). Leave at least 1-2 inches inch between the scones on the baking sheet. *** You can either work your dough in a floured surface or directly onto your parchment-lined cookie sheet but be sure to use your cutting tool to slide the wedges apart, so they don’t melt together in the oven.
  9. Chill your wedges on the cookie sheet for about 15 minutes. (This step will also keep the dough from melting into one big glob and keep your scones in lovely wedges. Remember, the whole idea behind the chilled, grated butter is to produce fluffier scones. Yu can refrigerate the wedges overnight if you want to prepare them ahead of time.)
    Optional toppings: glitter or coarse sugar, vanilla icing, but they are sweet enough for those who don’t want the extra sugar.
    If desired, you can brush cream across the tops of the scones and sprinkle with a coarse or glitter sugar. OR you can make a quick vanilla icing of sifted confectioner’s sugar, vanilla and cream to drizzle on top after the scones are baked and have cooled slightly.

IF you have any scones left over, I recommend refrigerating or freezing them once cooled and heating thawed scones in the microwave or oven. I love them served warm with a tub of Kerry Gold unsalted butter.

Helpful Hints:

^+ 2 tablespoons flour for working the dough

*or a regular, good quality if you don’t have Vietnamese cinnamon, available from King Arthur; Vietnamese has a higher essential oil content and a stronger, almost sweet flavor

++ or less, but I want sweet, juicy berries in every bite!

NOTE: As tempting as it may be to skip the chilling steps, DON’T! I’ve done it in my haste to bake and eat already! But the end results are much better if you chill the dough while you mix your wet ingredients and before you bake.

Banana Coco-Nut Scones

Some days I write for therapy, but many days, I eat for therapy and emotional comfort. You know your ideal comfort food, and many times it is based upon childhood favorites and nostalgic memories. I teach high school language arts, and as an “old” new teacher ten years ago, I was reminded that we can never assume what our students do or don’t know. One word they’d never heard was “nostalgia.” I suppose because of their short, young lives of emotional upheaval, they rarely looked back with fondness on many childhood memories.

I defined the word for them from my own perspective, stating that nostalgia for me was a sudden reminder of something good from my past, triggered by a smell, a sound, or a taste. Of our five senses, smell lingers longest, and I explained that walking past a bakery and smelling fresh baked breads would remind me of my great aunt’s Italian bakery in Harlem. Smelling cinnamon and donuts frying brought back summer mornings waking to donuts frying downstairs in our landlady’s kitchen.

Life has been crazy hectic these past two years, and crazy does in fact run in my family. Sometimes I feel like announcing to a room, “My name is Chelie, and I have a problem.” Probably my biggest problem is turning to carbs for comfort. So I try to adjust recipes to at least feel like they are healthier. My friends marvel at the way I add ingredients to use up leftovers or substitute for missing items, and still manage to produce a very edible end product. Rarely do I follow a recipe verbatim, unless it is baking, but then I mostly try to be sure I’ve got the right ratio of dry and wet, leavening agents, and flavor combinations.

Here is my latest scone recipe. I actually found a recipe for cream scones and forgot to add the cream, but with the other liquids and banana, they came out just right; light, moist, and crumbly. My sister the chef asked for the recipe, so they come highly recommended.

Banana Coco-Nut Scones (pictured after separating, but before glazing)

1 ½ c. spelt flour

½ c. hazelnut flour (mortgage the farm, but worth it)

½ c. buttermilk baking mix

1 T. baking powder

¼ c. coconut sugar (Trust me)

¼ t. sea salt


¼ c. ice cold butter, grated

¼ c. coconut oil

2 eggs (TIP: crack into a small cup before adding, to avoid shells in your baking)


1 t. Madagascar vanilla

1 very ripe banana, mashed

¼ c. heavy cream (if you don’t forget!)


Dash each of cinnamon & nutmeg, or use pumpkin pie seasoning

¼ c. raisins, currants, or dried cranberries (or fresh blueberries!)

¼ c. chopped nuts or seeds (I had peanuts & sunflower seeds so I used both)

Glaze:

½ c. powdered (confectioner’s) sugar

2 T. heavy cream

Preheat oven to 425.

Line cookie sheet with parchment paper (I lightly spray it with cooking spray)

In a food processor:

Combine flours, baking mix, sugar, baking powder, cinnamon, nutmeg, salt. Run to combine. Stir together butter, coconut oil, eggs. Pour through spout as your processor is running. Pour in vanilla and add in banana and nut mixture. Run just to combine thoroughly. Pour in heavy cream IF mixture looks too dry and crumbly. Once you see the dough ball up, remove from food processor onto your parchment lined cookie sheet. Using your floured hands and a well-floured rolling pin, roll and flatten the ball of dough into a round, about ½” thick.

Using a sharp, pointed knife, cut into 8-12 wedges. First cut in half, then quarters, then decide how big a scone you want before cutting the additional wedges. I then flour the knife and drag it through my cuts, gently separating the wedges just a bit,   so that each scone develops an allover crust while baking.

Bake 12-15 minutes, until golden brown. Remove from oven. Cool slightly, but while still warm, drizzle or brush each scone with the glaze. Use a wide spatula to serve.

Enjoy while still warm!


Cincy, OTR, & Lexington, Ky

May-June 2016
This travelling Summer Foodie is back on the road with my wonderful, hardworking husband, Bobby. I am still waiting for his company to send him some place exotic, like Brasil or Dubai. In the meantime, I have been fortunate to travel to beautiful states such as Tennessee, Ohio, and Kentucky.

Most recently, I met up with my hubby in Cincinnati and spent eight days visiting museums, street scenes, and historic sites. As it was Memorial Day Weekend, we spent Sunday at the Newport Aquarium, followed by lunch along the river at Mitchell’s, a restaurant in the Landry group. We were married on Memorial Day weekend, so we make it a habit of celebrating the date, the day, the nights — really, we do celebrate our life together each and every day, but I don’t want to make you gag! After all, this is about food and life, but I do want you to be able to keep your food down.

Oysters, of course, for Bobby, followed by a seafood trio of shrimp, scallops, and salmon. I pordered the cedar planked salmon with goat cheese on a bed of grilled veggies. With all that, and craft cocktails, diod we need dessert? No, but our gracious hostess and waitress sent out vanilla bean creme brulee, gratis. Hog heaven. Soo-ey! Great views of the Ohio side of the river (Ohio) and the foot/traffic bridges that many locals cross by foot to frequent restaurants and happenings in downtown Cincinnati or OTR (Over the Rhine area).

On Saturday, we ate our way through Taste of Cincinnati. We weren’t really impressed until we happened upon Alfio’s (Italian-Argentine cuisine) booth; the brisket and 5-cheese ravioli was a giant housemade puff of pasta crammed with shredded beef reminiscent of my Grandma Dearie’s “gravy beef,” marscapone, romano, mozzerella, ricotta (?), and parmesan (?). I hope memory serves  me on the cheeses, but marscapone was definitely present. We walked by the booth to tell them how great their food is, and Scott introduced himself and thanked us profusely for our feedback. If I return to Cincy this summer, I hope we can make time to visit onsite for dinner.

RECIPE TIP: When Bobby and I cook fresh fish, we soak cedar planks overnight so they won’t catch fire and burn. We rub the fish with different salts and spice mixes of hubby’s fabrication. A lifelong fisherman, Bobby will tell you there are few restaurants that cook fish well, meaning not overcooked and dried. Once the fish loses its glossy opacity, pull it off the heat!


Summer Foodie

As a teacher, I have summers “OFF” (this is really an illusion, as most of us spend summer days at workshops, planning for the new CCSS, reading YA novels — so many books; so little time, and spending money on our classrooms as we travel), so I travel with my husband, a global manufacturing consultant. While his days are spent working as a consultant at different companies, I tour my new surroundings, often on foot so I can walk off the culinary explorations. I love photography and I love to learn the history and culture of a place, which in the summer of 2014 meant Massachusetts and Rhode Island. Lobsters, oysters, clams — okay, fresh, local fish and shellfish. Blueberries, cranberries, craft beers, local wines, and locally grown vegetables are in abundance. So much food; so little time.

With my French-Italian heritage, I unfortunately live to eat rather than eat to live, so I research local chefs and eateries as I plan my daily roaming. I find unique ways to “cheat” on my diet — um, lifestyle change. Lately, I have tried to avoid white carbs and sugars, so I make it a game and I never feel hungry. I try to save the bulk of my calories for dinner, my favorite meal, so I can lead my husband to a fabulous, romantic meal. Some important criteria are ambiance, view (waterfront if possible), beverage choices, service, and of course, local food offerings.

In the current trend of farm-to-table, this has been a rather tasty, healthful way to dine. Local chefs actually list the vendor names on their menus. Not only do you know about what you’re eating, but often you learn what your food was fed! Certainly, price plays a part in my decisions, but we have been known to splurge a time or two when away from home for more than a week at a time. This may blow the “grocery budget,” but I try to record notes on dishes and preparations that I can later try to recreate at home. Since my husband travels so frequently, we try to cook together when he is at home. We enjoy cooking, eating, and entertaining, so for us, this is fun and festive.

On Cape Cod, one can dine and drink at the poshest country clubs, or one can spend a frugal weekend picking up lobsters steamed to order at the local Star market for about $6.00 a pound. Grab a container of lobster bisque from the deli section’s refrigerated aisle, a few ears of corn, salad fixings, local wine or beer, and a family feast can be pretty reasonable. We fed four of us for under $40, and the lobsters were among the freshest we’ve ever eaten, with shells so soft, we barely used the shell crackers or picks. The meat filled the shells, rather than showing tank age by shrinking away from the shells. Make sure to ask your server for advice if you don’t know how to pick out your own live and lively lobster from the tank.

In Plymouth, the famous Wood’s seafood shop and restaurant steamed two lobsters for me and packed them to stay hot for up to three hours. I added a deli roast chicken and slaw, a bottle of Prosecco, and surprised my husband with a gourmet dinner set up in our hotel room. He often puts in such long days, that going out isn’t an option. If I know this in advance, I can be creative and bring in dinner, or we can dine poolside at the hotel, or I can simply eat my main meal for lunch and bring him something light but hearty and healthy if he’s been living on office coffee, bagels, and pizza all day.

One of my day trips led me to the Massachusetts southern coast. I decided to drive east to historic Route 3 and drive south from Hull Village to Plymouth. I stopped for lunch in Hull at a fish market that also contained a cooked-to-order lunch counter opposite the fish counter. They even offer to cook your choice of fish from the day’s catch if you can’t find something on their endless lunch menu. I opted, at my server’s suggestion, for the day’s striper tacos. Normally, I don’t eat tacos wrapped in flour tortillas, but these proved to be an excellent diversion from my rule. The local, fresh-caught striped bass (I also splurged on lightly battered and fried rather than grilled) spilled out of the tortillas in big chunks of moist and delicious goodness. Served with a fresh slaw vinaigrette, it was a perfect lunch as I sat outside at a picnic table near the marina and photographed the scenic view of Victorian homes dripping down the village cliffs like icing on a wedding cake.

June 2016: My husband has been working in Cincinnati this past year, so the food tour is quite a bit different. I will cover it in another post. However, time permitting, we are planning a vacation from Rhode Island to Maine this July. Maine Lobstah actually consumed in Maine! I hope to check that off my bucket list.

ROAD TRIP! SUMMER FOODIE IS BACK!  Rereading this post reminded me to mention the fabulous restaurants on “The Hill” — Federal Hill — in Providence. One night, my husband ordered oysters at The Providence Oyster Bar, only to be offered a selection of over 10 varieties! My oyster-loving husband was in shellfish heaven! Despite some negative online reviews, service was great, staff was friendly, knowledgeable, and accommodating, and prices were fair.

If you love shellfish and are in or around Providence, do not miss Hemenway’s Seafood Grill and Oyster Bar! This is a pretty upscale place, boasting that they are the place for power lunches. However, the service was great, unpretentious, and the cold seafood platters on ice had our eyes bugging, our mouths watering, and our bellies euphoric. An important tip to remember is to order a restaurant’s specialties, based upon their locale. That way, you will be happier with your meals.

If you’re really craving a great steak, try Waterman’s Grille on the Seekonk River. I dined here two or three times, both with my cousin, a local doctor, and with my husband. No disappointments. If you are into presentation as well as quality and a riverfront location, this place delivers. Dining available indoors and out.

I hope we can make it back to The Hill this summer; I’ll keep you updated.


The Only Creamy Green Chili Chicken Enchilada Recipe You Will Ever Need

I spent 21 years in southern New Mexico, so my cooking was a Tex-Mex-Hatch Valley-chile-inspired marriage. Like my sister, our French-Italian heritage also sometimes shows up. Funny how my Mexican-American friends often asked me to do the cooking! I have included a “slimmed-down” variation, but the richer one is, of course, best. Also, to me, corn tortillas do enchiladas and tacos make. Leave the flour tortillas for burritos, chimis, and fajitas (I happened to read this same belief from the chef/owner at Tallulah’s in Providence, RI). Traditionally, I tend to roll chicken enchiladas and use green chile. I use red chile enchilada sauce with beef fillings and Colby cheddar stacked and layered with corn tortillas, like one would layer lasagna (later post). Red chiles start out green, but turn red if left on the vine longer. These reds can be dried and strung to hang as ristras (very festive during the holidays), readily available to reconstitute when cooking sauces, stews, tamales, and chilis.

Remember, I cook with my senses, so measurements are sometimes approximate.

For a party:

36 corn tortillas
2 cans cream of chicken soup, rinse each can with half can of water or milk and add to the pot
2 cans cheddar cheese soup (I’ve tried the Nacho soup, but this gives it a more watery consistency for some odd reason) rinse each can with half can of water or milk and add to the pot
2 lbs. shredded Monterey Jack &/or Co-jack cheese, &/or pepper jack for more spice
Cooked, shredded chicken** (white meat preferred), about 10-12 oz.
**You can roast, skin shred a chicken or chicken breasts, or buy cooked Southwestern flavored chicken breast strips or deli roaster and cut into bite-sized pieces
1 can evaporated milk (makes your sauce velvety smooth), rinse the can with 1/2 can of  water and add to the pot
Milk or half & half to add  to your saucepan as needed (you want your sauce rich and creamy, not runny, but not like the consistency of condensed soup)
2 cans chopped green chiles (Yes, in NM in the Fall, we buy fresh Hatch green chiles known as Big Jim’s in 40 lb. batches; we get together to roast and peel and chop them, freezing bags for cooking during the year. I still remember the scent of roasting green chiles from the giant roasters in supermarket parking lots wafting across the valley, but you can roast yours on a grill or in the oven, drop into ice water, and the skins will peel right off.)
1 large sweet onion, finely chopped
Olive Oil (you will have about a 1/4 inch depth of oil in your fry pan; you may substitute any cooking oil, but you will get a different flavor)
fresh garlic, chopped or use garlic powder to taste
1 T. Cumin
1 t. Adobo seasoning con Pimienta o sin pimienta   (w/wo pepper)
1 t. dried oregano leaves

When serving a crowd, I tend to keep my dishes mild to medium and serve a spicy pico de gallo or salsa on the side for those who want more heat. This dish requires having your ingredients prepared and ready for creating the “enchilada casserole.”

You will need a large saucepan for your sauce and a frying pan to fry your tortillas. You also need a 13×9 inch baking pan. You can use some of the leftover oil from frying tortillas to grease the sides and bottom of the pan before assembling the enchiladas. Once you are ready to assemble your enchiladas in the baking pan, heat your oven to 375.

Heat a tablespoon of olive oil in the saucepan and add your garlic and spices. Stir in the canned soups, the canned milk, and green chiles. Using a whisk, completely blend your ingredients so there are no clumps of condensed soup.  Add half and half or milk as needed if you need to stretch your sauce to cover more, or if you want it a bit thinner. If you want your onions super-cooked, you can saute them in the oil before adding the soups, otherwise you can add them in as you fill and form your rolled enchiladas. Once the sauce is completely heated through, cover and set aside, removing from the hot burner and being careful not to scorch the bottom.

In your frying pan, heat about 1/4 inch layer of oil (olive or other). Have a paper towel-lined platter ready for your fried tortillas. Using tongs, carefully fry corn tortillas on one side until they puff slightly, but don’t let them crisp. Flip them, quickly fry the second side, and remove from the pan to the paper towels. Layer more paper towels if you need to stack your cooked tortillas. They really absorb oil, so drain them well over the pan before moving to the paper towels.

Using a ladle, coat your baking pan with a thin layer of your soup mix/sauce.

Dip a tortilla in the hot soup mixture. Lay in the pan. Using your hands, sprinkle a layer (about a T. of each) of chicken, cheese, and raw onion, if you didn’t cook it into the sauce. Roll tightly, and repeat, laying the rolled enchiladas tightly in the pan, trying not to leave any spaces. You can be as generous as you want with your fillings, depending on how much of the ingredients you have and how fat you want the enchiladas.

If you need to stack another layer, which is good if you want to let these bake, set, and then slice, then add another thin coating of the sauce across the first layer, sprinkle with cheese, and begin your next layer of enchiladas. The last layer will be a generous covering of sauce and cheese.

Bake in a 375 oven for about 30 minutes, or until hot and bubbly, and slightly browned on the top and edges. Do not overcook or they will be dry! Do not undercook, or they will be soupy and the cheese won’t be completely melted.

Remove from the oven and let cool slightly to set. Like lasagna, this step makes it easier to cut into serving squares. Or, you can serve 2-3 rolled enchiladas per person.

Condiments & Accompaniments:

Salsa of preferred “heats”
 Pico de gallo (more of a fresh salsa) If making your own salsa, a good rule of thumb on hot/chile peppers is that the smaller and pointer they look, the hotter they taste! Careful not to tough your face or eyes. If you do, flood the area with cold water. If you burn your tongue, don’t drink water; eat bread, or drink milk or pineapple juice.
Sour cream
Chopped iceberg lettuce (this is probably the only time I use iceberg, but it helps to cool the palate and looks pretty)
Chopped tomatoes
chopped raw onion

Some New Mexicans like a fried egg served atop their enchiladas, but we usually do that with red sauce and ground beef filling. Just omit the soups and green chiles, use 2-3 cans red enchilada sauce if not making your own from reconstituted dried red chiles, and fill with sautéed ground beef and Colby cheddar. You can omit the meats altogether for a Lenten or vegetarian version, and you can use refried pinto beans as a filling, but I prefer the beans fried in cumin, garlic and olive oil 🙂 and topped with cheese as a side dish.

To slim down this recipe a bit, steam or soften your tortillas wrapped in paper towels in the microwave instead of frying them. Cut back to one can each of the soups, 2% milk, and add two cans of Old El Paso green enchilada sauce. Use low-fat cheeses. Use portion control 😉

To make a smaller batch, use 1 dozen tortillas, 1 lb. cheese, half the soups — you get the picture.

Enjoy!


Image

Eggplant Parmigiana

Elongated slices of eggplant give a more meaty, less seedy bite.

Elongated slices of eggplant give a more meaty, less seedy bite.

Grandma Dearie’s Eggplant Parmigiana (Always read a recipe through at least once before attempting):

1 good-sized, firm, pretty purple eggplant
3-4 large eggs
milk, splash/dash/less than a 1/4 cup
Italian flavored breadcrumbs at least one cup
flour, all-purpose, at least one cup
olive oil
Marinara Sauce (see recipe from first post)
1 lb. shredded mozzarella, or buy a fresh mozz and slice thin or tear it with your fingers
grated Parmigiana or Romano cheese
1 glass of red table wine or Chianti
Oven proof glass or metal baking pan (I prefer glass, 13×9 or smaller, which yields taller stacks) wiped with olive oil to prevent sticking

Oven preheated to 375 degrees, rack centered

NOTE: As always, measurements are suggested, and can be adjusted according to taste, diet, or availability of ingredients in your pantry

Helpful prep hints included:

1. Grandma taught me that to make the layered stacks of cheesy, saucy goodness taste more meaty, one should cut the eggplant in this way:
Slice or chop off the stem and discard. Lay the eggplant down flat and cut through the middle. Peel each half with a sharp paring knife. Stand each end on the cut side. Slice in 1/4 inch slices so your slices are long and not round. This will taste more meaty and less seedy. Trust Grandma. She knew. She’s watching.

2. Once your eggplant is sliced, soak the slices in a large bowl of salted (1T) cold water as you prep for frying and assembling. Drain once you are ready to coat and assemble your dish. To drain, Press a plate down on the eggplant — do this in the sink so the water can freely overflow. Drain the remainder of the water.  You will be surprised at how black the water has become! Note that this is bad for you, but for some reason, the eggplant coats and cooks better if you take the time to do this. Remember, Grandma said!

3. Make, heat or reheat your Marinara sauce (or used jarred, but first make the sign of the cross and apologize to Grandma)

4. Line a large plate or platter with paper towels for draining your eggplant after it cooks in the oil

5. Mound your breadcrumbs on a generous piece of wax paper* (you can lift and toss with the edges of the paper to evenly coat the eggplant slices)

6. Beat your eggs with milk in a glass pie plate (use a fork, completely blend the egg yolks and whites) – salt and pepper to taste

7.  Beat 3-4 eggs with a splash of milk (Grandma eyeballed everything — she NEVER measured unless she was baking, but even then, it was a pinch, a handful, a dash, etc. A coffee cup might easily serve as the measuring cup if that was the nearest cup she saw.

8. When adding olive oil to your frying pan, you only need about 1/4 inch of oil for your eggplant. We are not deep-frying here, but frying on a medium-high heat until eggplant slices are golden brown and nearly cooked through.

9. Have the oil heated in the pan, ready for the eggplant slices to “surprise” it, but not to smoke the oil or brown too dark. Keep your OLIVE oil handy, in case you need to add more (and you will)

10. *My mom and I always say, “FEC,” so we remember to first dust the eggplant slices in Flour, next dip in the Egg mixture, then lastly coat with the flavored bread-Crumbs. 😉 I sometimes mix equal parts flour and breadcrumb and simply go from this mixture  to the eggs and back again.
This step can be totally eliminated, and the slices can be sautéed “naked” if you are trying to cut the carbs. Simply cook in the oil until they are lightly browned and start to soften. You can even saute fresh basil leaves and layer them into the pan when you assemble the dish. Smell the eggplant as it cooks in the oil. I can smell it now, as I write! 

So go ahead; coat your first batch of eggplant slices — FEC — and gently add to the frying pan. In my finished photo, you will see I’ve added a layer of chicken cutlets: pound thin, then follow the FEC method, cooking until golden brown and nearly cooked through (see cutlets in photo below).

Cook nearly through; cooking will continue while baking

Cook nearly through; cooking will continue while baking


Okay, so work quickly and efficiently, watching your heat, adding oil to the pan as needed, and letting the fried slices drain on the paper towel-lined plate. As your eggplant is cooking, you can continue the process of FEC, leaving the coated slices on the edge of the wax paper, ready to fry.

As your slices are browned on both sides and beginning to soften, remove them to drain on the paper towels. Keep adding paper towels and simply stack on the plate until all the eggplant is fried and drained.

This is the fun part. Add a generous ladle of marinara sauce to your oiled baking pan. No, this is the fun part. Add a layer of eggplant, fitting them side-by-side — juxtaposed 🙂 — in the pan. Work like a bricklayer, trying to fill the gaps by fitting the larger slices and then adding the smaller around them. Use a spoon the thinly top the slices with more sauce — don’t flood the pan with sauce! Okay, so this is fun, too! Top the slices with shredded or sliced mozzarella, sprinkle with grated Parmigiana or Romano cheese. Top with another layer of eggplant. Continue until all the eggplant is layered in the pan, ending with your sauce and then cheeses. You may sprinkle the top with dried oregano, if desired. Grandma cooked pretty plainly, considering it was fabulous Italian food!

Bake in 375 oven for at least a half hour, or until hot and bubbly, and the cheeses appear to be melted.

This dish is best served after “resting” or cooling on the counter. You can either serve it warm rather than hot, or reheat, but this way you can slice into the stacks or lift an entire stack easily with a spatula and serve a complete stack per person. This resting process keeps the stacks from mud-sliding on the plates, and works for lasagna as well.

Toast the dish with your filled wine glass. Whisper, “Sante!” Drink the wine.

(Note: As a highly satisfied member of Nakedwine.com, I recommend Stefano di Blasi Chianti Classico 2013)

Mangia! Serve and Enjoy!

Baked Ziti (foreground); Chicken & Eggplant Parmigiana (background); note the meats cooked in the"gravy" are served as a side dish with a bit of extra sauce/gravy

Baked Ziti (foreground); Chicken & Eggplant Parmigiana (background); note the meats cooked in the”gravy” are served as a side dish with a bit of extra sauce/gravy


The Gravy!

Okay, so now that you can master a basic marinara sauce, we are going to build on our foundation. My family members have been accused of holding back when sharing recipes, simply because people forget that one cooks with love, from the gut, by using the senses. Perhaps the same cannot be said for the chemistry of baking, but when preparing a savory dish, usually one can rely on one’s own preferences.

Consider the typical Italian Sunday dinner. The recipes below provide for only the pasta course, served with the meats that were cooked in the gravy (you say “tomato sauce” I say “THE GRAVY”). The Gravy

Grandma Dearie would say that a good cook uses fresh, quality ingredients. If you do this, diners can salt their own food. The herbs will properly season the food. Over the years, I came to the realization that my French side used cheaper cuts of meats, cooked the hell out of them, and covered them in rich, heavy, wine laden sauces (I am quite sure I will hear about this generalization, but as I grew up trying to master the cooking from both sides, this is how it seemed). Grandma was from Naples – Neapolitan – and of course, she thought she cooked better than our friends and neighbors, “the Barese” or the Sigiliana.” And vice versa.

To me, even as a child, the Italian side seemed to focus more on a few fresh, quality ingredients; preferably home-grown herbs and vegetables, choice cuts of meat, and homemade or good quality semolina pasta. Of course, as I experimented, poured cookbooks, and devoured cooking shows, I learned to add a healthier, modern touch for my growing family. Like my sister the chef, I married the Mediterranean cooking we had learned at home with foods I enjoyed on my travels. Garlic and olive oil – any good flavorful oil, meats in casings, and bread and pasta of some sort, seemed to pop up in many ethnic recipes.

Cooking for me has been a life journey. Learning new recipes, savoring a dish in a restaurant and trying to recreate it at home, incorporating traditional recipes from my childhood with new seasonings and ingredients taught me to celebrate life through food from my travels and experiences.

Something I learned from Grandma Dearie is that you measure by eye, season by taste or smell, and time by appearance. Use your senses; use your heart, when cooking what I consider to be peasant Italian, but what most people now find in finer dining establishments (watch for my zucchini squash flower appetizers).

We will focus first on the meats that go into The Gravy. But first, refer to the Basic Mariana Sauce (from the post, Consider the Sauce) and prepare it. Let it simmer in a large Dutch oven while we prepare the meats that will be added into the pool – er, pot.

The Basic Marinara Sauce-to-Gravy (refresher course)

Virgin Olive oil to coat your large Dutch oven (with a lid)

3 cloves fresh garlic, finely chopped or minced

3-4 leaves fresh basil

Dry or fresh Italian herbs (optional)

2 cans premium quality plum tomatoes (remember, you want to smell sunshine, like the scent of a fresh picked tomato on a hot summer’s day)

2 small cans tomato sauce (not paste, according to my Napolitana Grandma!) NOTE: This ingredient isn’t in your marinara recipe.

Over high-medium heat, brown garlic and herbs in olive oil coating the bottom of the pan; add your tomatoes and tomato sauce; lower to simmer on a back burner while you cook your meats.

To give The Gravy its rich, meaty depth, we next have to assemble our meats that take longest to cook. Remember, Gramps would have all the meats ready on plates in the fridge for Grandma to use as she was ready. The meats will then simmer in the tomato sauce on low for 2-3 hours, minimum, until the meats are fork tender and the sauce is thick and rich with some of the meats that have begun to dissolve, transforming the sauce into: The Gravy!

Bracciole (beef rolls): 1. Thin cut beef slices, usually labeled in the supermarket meat cases as “for bracciole” (often round steak). Grandma Dearie would take a mallet and bang it out flat and tender, whether it needed it or not. 3-4 rollups can be halved or sliced for your guests, as there will be plenty of other meats to sample.

2. Italian flavored breadcrumbs, 1-2 cups, depending upon how many rolls you wish to make.

  1.  Pignoli (pine nuts), these are quite dear (expensive) as my grandfather would say — he also nicknamed Grandma Dearie  — so you decide on ¼- ½ cup

4. Fresh flat leaf parsley, chopped, remove most of the stems, about ½ cup (Be careful at the grocery store! Don’t grab cilantro by mistake!)

5. Garlic, chopped, 2-3 cloves (My mom likes a little food with her garlic, so again, your preference)

6. Grated “parmesan” cheese (Buy a nice one from the deli case, and make sure it is cheese and doesn’t contain fillers): Pecorino Romano, Parmigiano, Locatelli Romano, Parmigiano Reggiano (God, my spellchecker hates me right now!) will all work. You can even buy it in block form and grate as needed.

7. Olive Oil – just splurge on a gallon, would you, and refill decorative bottles to keep on your counter, in your pantry, on your table so you don’t run out EVER!

8. Toothpicks, plain — not dyed (or thread if you are out of toothpicks, but NEVER mint flavored dental floss!)

Toss together all ingredients except the oil, beef, and toothpicks (duh). Do you feel compelled to salt and pepper your filling? Go ahead, but remember, salt can be added by the diner, and cheese adds saltiness. Some cooks add slices of prosciutto, chopped onion, etc., but less is more, and all of this will add flavor to your Gravy!

Have ready on medium a heated frying pan coated with olive oil.

Assemble: Lay a thin slice of beef on a piece of wax paper. Sprinkle a generous Tablespoon or two of your breadcrumb mixture. Roll up to resemble small logs, about 2×4”. Use 2-3 toothpicks to hold together, or wrap and tie with string or thread. Refrigerate until ready to cook.

Meatballs: 1 lb. ground chuck, — Many cooks use some sort of mixture of beef, pork, & veal – (1/3 of each works) – we don’t.

  1. 1 c. Italian flavored breadcrumbs
  2. Garlic, 1-2 cloves chopped fine
  3. Fresh chopped parsley ½ c. (déjà vu all over again, right?)
  4. Dash dried oregano or Italian herbs (if you have fresh, but of course, use them!)
  5. 1 egg (Add a drop or two of milk as you combine if mixture seems too dry. The trick is to have more meat than anything else, so you may want to cut back on breadcrumbs or parsley. Too moist, and they will fall apart in the sauce. Tricky, yes, but keep your balls firm – oh dear.)
  6. Pignoli ¼ c. (I know! They are dear!)
  7. Combine all ingredients, roll into 3” smaller-than-base-balls (my daughter’s first looked like baseballs, but that’s okay, her fiancé is a pitcher), set on wax paper-lined plate in fridge

Italian sausage (can be bought with or without fennel, which my mom despises) ½ hot, ½ regular, so maybe ½ to 1 per diner

1-2 pork loin chops or ribs, bone in

1 small Chuck filet for more flavor! More power! Any of these meats can be omitted according to individual taste. READY!?!?

Brown bracciole on all sides in the heated frying pan that was coated in olive oil (remember?)

Remove to a platter

Brown meatballs (sometimes I roil these on a foil lined cookie pan, but watch closely and turn to brown all sides)

Remove to the platter

Brown sausages, hot and/or mild

Remove to platter

Brown your pieces of pork and beef. Add to the platter.

Stir your pot of sauce to be sure it is not sticking on the bottom. This is why a good heavy pot or Dutch oven is necessary. Slowly add your meats to the pot in this order: bracciole, pork and beef pieces, sausages, and meatballs, layered ever-so-gently on the top. Cover, and simmer on low for 2-3 hours.

If you leave the gravy simmering while you go to church, go surfing, work out, or however you spend your Sunday mornings, be sure someone is home to stir from the bottom or lower the heat. Nothing tastes worse than blackened tomato sauce, and there’s a lot of money I that pool. Not sure if the gravy is done? Slice into the piece of chuck. Does it fall apart? Are the meatballs firm and is the gravy now thickened by all that protein? It’s ready.

Boil a large covered pot of water. Salt optional. Drop of olive oil is optional, too. Remove the lid. Stir your pasta into the rapidly boiling water. Cook according to taste or package directions. Remember, fresh pasta is already soft and requires about the half the time as boxed dry pasta. Drain well. Move to a large pasta serving bowl. Drizzle lightly with olive oil.

Remove meats from the gravy and arrange on a platter. Pour the remainder of the gravy over your cooked pasta, (reserving a bit). Toss together. Top with a scoop of sauce and grated cheese for presentation. If desired, serve the remainder of the gravy in a gravy boat. Serve with additional cheese, crushed red pepper flakes for those who like diablo (spicy). Add a hot loaf of crusty Italian bread and a salad and this could be enough for the average person’s dinner.

Unless you’re part Italian. Then this is a course served after the Antipasto, the Stracietella, and before the roast with oven browned potatoes and a veg. But if you insert a slice or two of apple at this point, to help you digest as Grandma Dearie would say, then you have room for Ricotta Cheesecake and cappuccino. Mangia bene!

Consider the Sauce

As Grandma Dearie used to say, “First, you gotta start with the sauce.” So we will talk about how she would cook it because her recipes always came with such sage (pun intended) advice for living, and then we will have a more practical recipe with items readily purchased at your favorite supermarket.

“Henry! Oofah! You always grow too many tomatoes!”

This complaint because Grandma would now have to blanch, crush, and can all the plum tomatoes that seemed to appear from magic seeds each summer. She would use the Summer Kitchen, the one in the basement of the two-family ranch that housed our extended family. Plus, the steps from the downstairs kitchen — my French American mom’s kitchen — led up into the backyard garden that filled one city lot. Once the quart jars were sterilized and  filled with the fresh tomatoes and a leaf or two of fresh basil from the garden, they were cooled, sealed, and stored on shelves in the playroom which also doubled as my dad’s office.

Sunday was Italian Dinner Day. “Henry! Go down and bring me two jars of tomatoes. And open them for me.”

My grandparents would rise early to start the sauce. Gramps would plate the meats that grandma would cook in the sauce, and we would wake to the scent of garlic sauteeing in olive oil. Once the meats were browned and added to the pot, the gravy was left on slow simmer while they went to the Italian Mass.  My parents took my sister and me to the noon Mass, so that when we arrived home, the food was ready and the feast began. We sat down at the table at one o’clock and we didn’t usually finish the meal until three. Once, when we visited Grandma Dearie’s siblings in Naples, we ate from noon until 8:00pm, with everything served from the kitchen on separate plates. They called us “the skinny Americans!”

So, Grandma Dearie’s Basic Marinara, followed by The Gravy:

1-2 cans San Marzano crushed plum tomatoes (or blanch fresh tomatoes in boiling water, peel them, and squeeze them with your hands)use quality tomatoes –they should smell like sunshine (use 2 cans if you have more to do than just dress pasta, i.e., a parmiagiana dish)

2-3 large fresh cloves of garlic

Virgin Olive Oil (no, this does not mean it was pressed from ugly olives; virgin or extra virgin refers to the pressings of the olives), enough to coat the bottom of a large kettle/saucepan

3-4  fresh basil leaves, whole or finely chopped to preference — Grandma would say, “twist them with your fingers, sniff the aroma, better than perfume, then cook the leaves with the browning garlic”

1 T sugar, according to taste

Salt to taste — lightly

SUGGESTED pastas: 1 lb. thin spaghetti, penne rigate, or bite-sized ricotta ravioli.
This is your basic Marinara sauce, without the meats, which is sauce and not “gravy:”

Simply saute the chopped garlic in olive oil on medium heat until it begins to brown lightly. Add basil, stir, then quickly add tomatoes so they surprise the oil and begin to bubble. Lower to simmer, cover and let simmer on low while you cook your pound of preferred pasta according to taste (note: fresh pasta is already soft and therefore cannot be cooked al dente; will take less time than boxed). Once your pasta is cooked and drained, your sauce is ready. This is one time you should not cook the sauce too long. You want a fresh tomato taste, enhanced by the garlic and basil. Toss sauce together with pasta, top with grated or shredded parmigiana. Please never serve pasta naked, always dress it!

The gravy version will be posted separately, with recipes for meatballs and bracciole. Meats will also include pork and Italian sausage.